
Cisco Login Banner – How to
How to create a custom #Cisco Login Banner
- Lets Start by connecting to #Cisco Switch using Putty

2. Next let login to the switch by typing “enable” followed by “Enter” and then the password.

3. Now that we have access to the switch lets get in to “Config Mode”. Type ” conf t” and then “Enter”

4. Now that we are in “Configuration Mode” lets continue to type ” banner modt #” to add a Banner

5. Lets start by adding some text for our banner. “I choose some skull ASCII text i found at ASCII World

6. After Pasting the Code in the available text field
Here is another one i did (also my current banner : ) )

7. Note that once you have entered your ASCII code you need to end the editing by adding a “m at the end”

8. Lets see what it looks like at the logon screen of the CISCO switch now
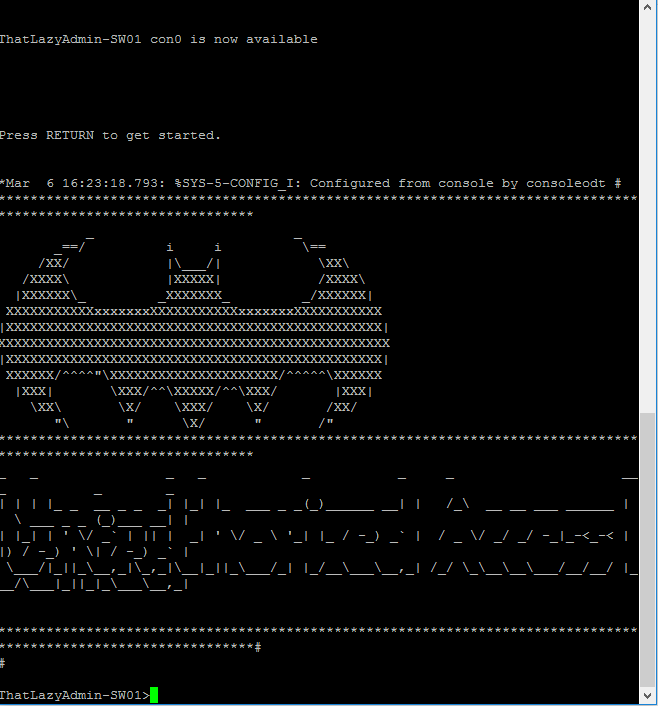
and there we go now we have a banner loaded on our Cisco switch 🙂
Here is a quick run down of the Commands used in order.
This example shows how to configure a single-line MOTD banner:
switch(config)# banner motd #Unauthorized access to this device is prohibited!#
This example shows how to configure a multiple-line MOTD banner:
switch(config)# banner motd #Welcome Authorized Users Unauthorized access prohibited!#
This example shows how to revert to the default MOTD banner:
switch(config)# no banner motd


